My employer recently divested themselves of some end-of-life hardware and several of my coworkers and I came into the possession of Lanner FW-8758 1U “network appliances”. These seemed like they’d make pretty good Linux servers, and I figured I’d document a little bit about the platform and process.
My other home servers are currently a Supermicro 5017C-MF and an IBM x3650 M2, which are both quite noisy. The FW-8758 has four small system fans plus a PSU fan, which together still seem somewhat quieter than the Supermicro. I haven’t put the system under any serious load yet though.
Hardware specs
The Lanner box can be configured with a variety of options. The one I received has a Core i7-3770 CPU, 8GB of DDR3 1333MHz RAM, and a single power supply. The x8 PCI-E expansion slot is not populated, and requires a card in a “Golden Finger” form factor. In the real world, this slot might be occupied with an expander that provides more copper or fibre network ports on the front of the unit.
Since there are only two memory slots on this board, I will have to debate whether it’s worth buying 2x8GB sticks to max out the 16GB capacity in the future. The unit also came with the optional VGA header and port, which was very useful in getting the OS up and running.
For local storage, I installed a 2.5″ Crucial MX100 256GB solid state drive that I had available from a decommissioned laptop. The unit could accommodate a second 2.5″ drive – there is physical room in the bracket, the motherboard has another SATA port and the 220W PSU also has a second SATA power connector that can be routed to the correct side of the case.
OS installation over serial
I attempted to install Ubuntu 18.04 using the server ISO written to a USB stick, making attempts with Rufus and Unetbootin. Rufus seemed better at generating a functional UEFI-compatible stick.
Since not all 8758’s have the VGA port hardware, my first set of attempts was trying to get the installation kicked off with an RJ45-to-serial cable, followed by a serial-to-USB adapter. Once I got PuTTY connected to the correct COM port at 115200 speed, the BIOS came up no problem, but the default Ubuntu install options didn’t display anything.
For serial output, there are isolinux/syslinux/grub directives that need to be added to the appropriate config files. ynkjm at GitHub has instructions for 16.04 and Unetbootin at https://github.com/ynkjm/ubuntu-serial-install that I managed to adapt and get to the text-mode installer. (Also see: http://www.sundby.com/index.php/install-ubuntu-16-04-with-usb-stick-and-serial-console/)
I was thwarted later on in the installation process by what I think is Ubuntu bug 1820604, where after the partitioning phase the installer dies with a OSError: Unable to find helpers or 'curtin' exe to add to path error. Dropping back to the shell, I couldn’t log in with ubuntu, root or Live System User – although I didn’t try liveuser which apparently can be added by USB stick generator tools.
A workaround might be to have a completely blank disk with no partitions, but at this point I resigned myself to dragging out a VGA cable to complete the install. Another approach might have been to install Ubuntu to the target SSD from another machine, and then simply move the SSD back into the FW-8758 chassis. Or, maybe, by the time you read this, the installation images will be fixed.
Of note, I selected to install with the HWE kernel, and made sure to select the OpenSSH server during the installation process. There are also quite a few pending updates, some of which are kernel vulnerabilities, so an apt update / apt upgrade / reboot cycle was the first thing I ran.
Software installation
The FW-8758 (without expansion card) has six Intel Ethernet ports on the motherboard; in 18.04 the leftmost one appears as enp2s0 and then they are mapped up to enp7s0 .
I debated a bit whether I wanted to Chef-ify or Ansible-ize the configuration for this host, but figured that most of it would be run through Docker anyway, so not much gain there.
I installed Docker CE using the official instructions, then added and ran a Plex Media Server image with my own scripts. Besides these, I also installed unzip.
For my CIFS mounts, I did the following:
sudo apt install cifs-tools- edited
/etc/fstabto add servers with the following parameters._netdevis supposed to avoid mounting before network is live andx-systemd.automountis supposed to make things play a bit better with systemd.
# Drobo 5N/5N2 with 'guest' access turned on
//192.168.1.4/Data      /mnt/drobo5n    cifs    rw,guest,uid=1000,file_mode=0777,dir_mode=0777,_netdev,x-systemd.automount 0       0

# Direct-attached disk shared from a Server 2019 system with SMB3
//192.168.1.3/Seagate8TB /mnt/seagate8tb     cifs    rw,vers=3.0,uid=1000,forceuid,file_mode=0777,dir_mode=0777,_netdev,x-systemd.automount,user=nas,pass=supersecret 0     0
You could probably also use a credentials=/path/to/secretfile parameter instead of the user and pass parameters, but the nas login in my setup isn’t super sensitive.
Rack mounting/ears
There is an available rack/rail set for this appliance, but it’s a separate line item to order and I don’t have a full-depth cabinet in the basement (…yet.) Instead, I have a 4U vertical wallmount rack that currently contains the aforementioned 5017C-MF server, a Cisco SG500 52-port PoE switch (surplus gear), an Ubiquiti EdgeSwitch 24 and a 12-port Monoprice patch panel. Because the server isn’t too weighty, I was hoping to get away with just “ears”.
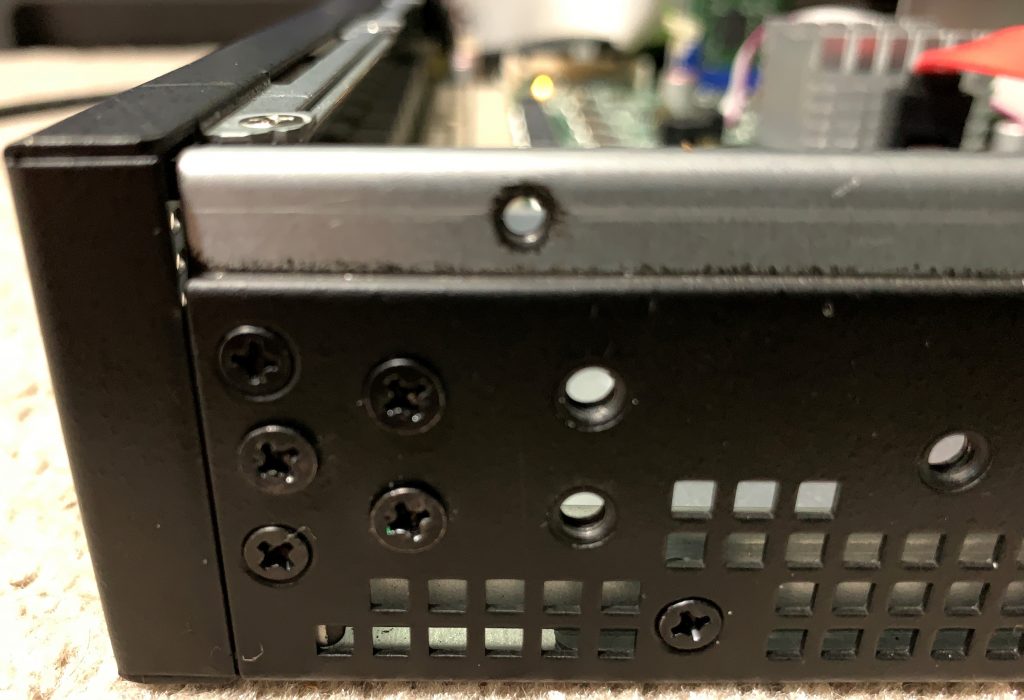
The left and right sides of the FW-8758 do have a rectangular pattern set of screws/screwholes that are 13mm wide (horizontal) by 10mm high (vertical), plus a fifth screw hole closer to the front of the unit. I haven’t found a “universal” set of rack ears that fits this pattern, and the spares I had from a Netgear switch are not compatible.

I’ll update this post if I do find something that works. Warren suggested he may look into 3D-printing a bracket that matches the pattern, but for now the machine is perched on a resin rack.