To avoid incurring the wrath of the annoying Rogers packet-injected “over your cap” message, I use two Internet connections to manage our bandwidth usage per month. As well as the 95 GB capped 10Mbps/1Mbps Rogers Extreme plan, I also subscribe to TekSavvy’s 5Mbps/800kbps Residential Dry DSL with the Unlimited option. These services each link into a router and are configured as such:
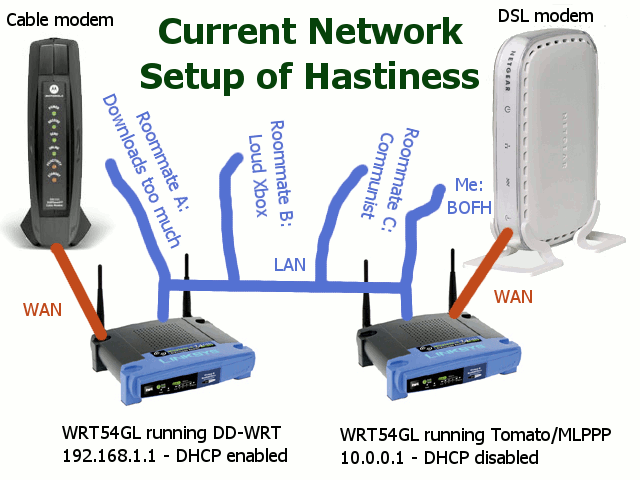
In this configuration, the 192.x and 10.x networks are currently not accessible from one another. That is, no traffic flows between the two ranges. If you’ve got a 192.168 private address, you’re using the cable connection; 10.x users get the glory that is unlimited (but slower) DSL.
Our server accesses the Internet primarily through the DSL connection, so that BitTorrent and other non-priority P2P traffic isn’t counting towards the cap. We’ve accomplished this with two network cards and static IP addressing in Windows.
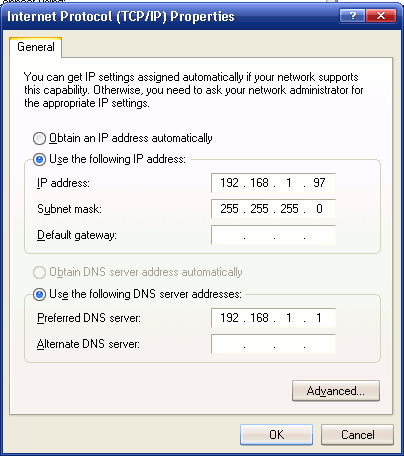
- Network card 1 has the static IP address 192.168.1.97, with subnet mask 255.255.255.0. No default gateway is set – meaning that Windows doesn’t try to throw Internet traffic through this card, but can access other machines (and be accessed) within the 192.168.1.x network. You can change these properties by right-clicking the connection in Control Panel > Network Connections, then selecting Properties and double-clicking “TCP/IP“.
- Network card 2 has a static IP address of 10.0.0.2, with subnet mask 255.255.255.0 and a default gateway of 10.0.0.1. This allows Windows to access the Internet through the 10.0.0.1 (DSL) router by default.
- The LAN adapters are also configured in Network Connections with the menu option Advanced > Advanced Settings. Network card 2 has the highest priority at the top of the list, followed by network card 1.
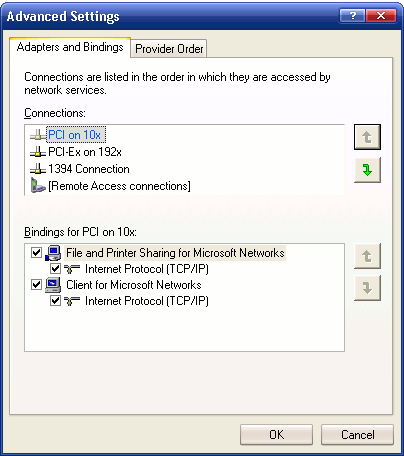
Once this setup is configured, all applications begin to access the Internet through the DSL/10.x network.
The next step is to configure Firefox (and any other desired application with SOCKS proxy support) to use the faster cable line. YouTube and standard Internet browsing don’t consume too much bandwidth – and setting this option in Internet Explorer forces system-wide use of the proxy, so you’ll want to use Firefox for browsing.
Both Tomato and DD-WRT come with built-in SSH servers. In the Tomato firmware, you can enable the SSH daemon in Administration > Admin Access. (It’s not necessary to open up remote access; just enable the server internally at port 22.) DD-WRT offers the same option in the Services tab under the Secure Shell frame.
There are two ways to enable a local proxy on your system. The first is using PuTTY and PuTTYgen, and the second involves installing Cygwin. I recommend using Cygwin as it’s more easily scriptable, and offers a set of neat Unix-style utilities.
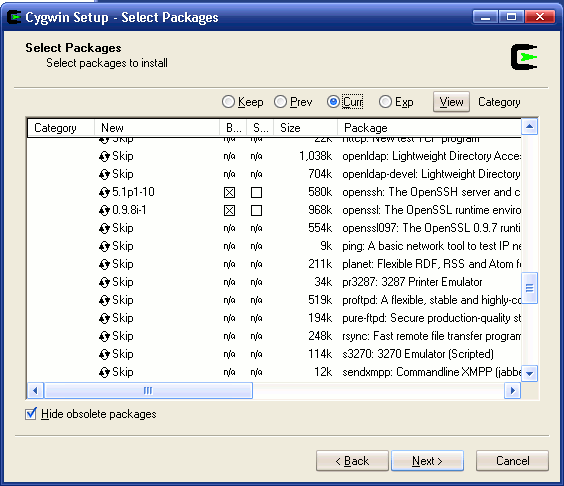
When installing Cygwin, accepting all the defaults should be fine. When choosing components, expand the “Net” folder and click on the “Skip” arrows beside openssh. This ensures the ssh client and key generation utilities are installed:
Complete the Cygwin installation and then double-click the desktop icon. Cygwin will initialize a user profile and provide a command prompt. At the prompt, enter the command ssh-keygen, then don’t provide an answer (just hit Enter) for the next three questions – location, passphrase and confirmation passphrase.
To load the generated key into the router, Open up Notepad and browse to your Cygwin home directory (C:\cygwin\home\username) by default; then access the .ssh folder and open “id_rsa.pub“. Select all the contents of the file and copy it to the clipboard.
You’ll want to paste the public key contents into Tomato or DD-WRT’s “Authorized Keys” section, and save/apply the router settings. Switch back over to your Cygwin window (or activate a new one) and issue this command:
ssh -D 7070 root@192.168.1.1
Replace 192.168.1.1 with the IP of the router if necessary. This command establishes a dynamic proxy tunnel on port 7070. Since this is the first time connecting to the router, answer “yes” to the RSA key fingerprint prompt. If you see a prompt similar to root@WRT54GL:~#, then you’ve authenticated properly with your public key. (If the router prompts for a password, there’s an issue with how your key was copied/pasted into the Authorized Keys box. Did you also remember to Apply Settings?)
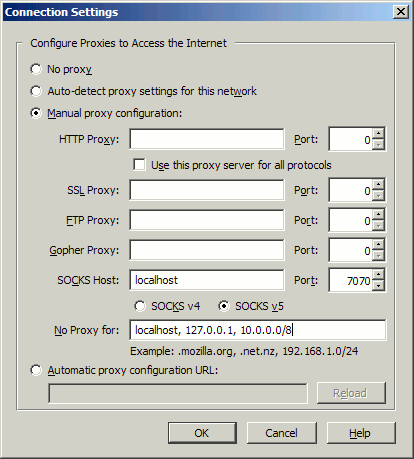
Now you can minimize the Cygwin window and configure Firefox. Select Tools > Options > Advanced > Network and click the Settings button in the Connection frame. Make your settings match the ones in the screenshot below:
Use whatismyip.org to ensure that you’re now connected through the correct Internet connection. Also make sure that you can connect to the 10.0.0.1 router through Firefox – note the exceptions, especially 10.0.0.0/8 in the No Proxy For dialog.
The final step for easy access is to create a shortcut to the SSH command. You can create a new Start Menu or desktop link to C:\cygwin\bin\ssh.exe -D 7070 root@192.168.1.1. It’s probably a good idea to put a link to this command in your Startup folder – Firefox won’t access any websites without the SSH tunnel running.
That’s all! You now have a fast Web browser that won’t blow through your cap, and can still use bandwidth-hogging applications like BitTorrent on a different line.
Comments are closed.