(Update 2015-09-20: Several readers have also reported that the instructions in this post to set the Static Port flag for the WiiU’s outbound NAT also seems to help with Splatoon connectivity issues. Following this logic, this change may work for any WiiU game that shows similar problems.)
One of the more entertaining games I’ve played recently has been Mario Kart 8. Even though I’m not very good, it’s great with friends, despite what seems like Nintendo’s complete aversion to online gaming.
Since I’m used to the better mechanism of party chat on Xbox Live, typically I run Skype on a laptop throughout the session to the group of friends I’m playing with. The MacBook Pro built-in mic/speaker combination does decent enough noise cancellation, which means that multiple players in the same physical room can both spew profanity and have profanity spewn right back.
However, the configuration needed to get online play functioning properly (and staying working) is not exactly straightforward or even correct on most places on the Internet. Most troubleshooting steps, including those from Nintendo for connection error 118-0516, eventually advise that you place the WiiU console in a DMZ. I find this to be unacceptable, because:
- (Update July 24/14: pfSense does have an option similar to a traditional DMZ, called 1:1 NAT and found under the Firewall / NAT / 1:1 configuration page. I still wouldn’t recommend it though, given that you may want to keep route certain ports to different services. Original content follows in struck out text.) pfSense doesn’t have a DMZ in the traditionally easily-configurable “send all inbound packets on any port to this NAT’d device” sense. There are ways to configure a DMZ in the more traditional network admin sense (eg: a separate network for Web servers) but there’s not an “easy button” equivalent to the Linksys/Netgear/D-Link version.
- It might be a bit neckbeardy, but I don’t like giving full inbound access from the Internet to a device behind my firewall, despite the fact that it’s running a more restrictive OS and network stack.
- Just ‘forwarding all ports’ to the WiiU interferes with other servers that I like to run on the same network connection. Lists of ports online elsewhere advise forwarding all UDP and a whack of (incorrect) TCP ports, but if I want to run Skype I don’t want to blindly send everything to the console.
The real key to getting past connection error 118-0516 with pfSense is to enable static port NAT for the WiiU. This setting also applies to other devices that use the Nintendo Network, such as the 3DS for Animal Crossing. Ensure you have performed basic network troubleshooting before reading further: these steps WILL NOT help if you have WiFi with packet loss or poor Internet connectivity in general.
(Seriously, don’t assume your WiFi is great because it works well for Internet browsing. Get numbers with ping and traceroute over an extended period of time, and correct the problem if it’s related to air quality or a flakey router.)
(Scroll down further if you just want to know how to change this setting.)
Rationale behind Static Port = No
Static Port is described briefly in the pfSense documentation as a security feature to avoid someone determining the device or OS behind your firewall, and is turned on by default.
The entire process works like this: when a LAN device attempts to create an outbound connection, there is both a source and destination port associated with that request. So your computer might request a website on destination port 80, but that request is “coming from”, or “sourced” from a port above 1024 picked by your operating system – something like 57894. You can see these ports by running netstat -n from your computer’s command prompt or terminal, and noting how local addresses with high ports have established connections to foreign addresses with standard ports like 443 and 80.
pfSense, thinking it’s doing us a favour, sees that outbound request and picks a “more random” source port on the WAN side to avoid exposing the internal source port. It keeps track of the LAN source port to WAN source port mapping in a state table. An more detailed example of this transaction might be:
Computer at 192.168.1.100 wants to get a website at http://example.com/ (port 80).
The OS on 192.168.1.100 starts a request from port 57894:

192.168.1.100:57894 > example.com:80

pfSense has to keep track of this request and send it out of the WAN connection.
It picks a new random port (eg: 32564) when it gets to the Internet connection.

192.168.1.100:57894 > modem.bigisp.com:32564 > example.com:80

pfSense now knows the state:
port 57894 internal == port 32564 external

Then when the request comes back from example.com, pfSense reverses the mapping:
example.com has a source port of 80 and sends data back to port 32564:

example.com:80 > modem.bigisp.com:32564 > (pfSense state) > 192.168.1.100:57894
To avoid going much further into this, WiiU and other Nintendo Network devices don’t like how pfSense does the source port translation, and as a result you will see connection errors when trying to establish a session with other players.
Set a Static IP or Static DHCP Lease
Since we will be configuring firewall rules for a single, specific device and don’t want another device to accidentally take over this IP, the WiiU should have a static IP set, or a static DHCP lease assigned in pfSense. To set a static DHCP lease, access Status > DHCP Leases and locate the WiiU console in the list. Click the ( + ) button next to the device and provide an IP address outside of the usual range – for example, if I had a DHCP range of 192.168.1.100 to 192.168.1.254, I might make the WiiU IP address 192.168.1.50. It may be useful to note in the description that this static lease is for the WiiU console.
Save the configuration and restart the DHCP server when pfSense prompts, then power cycle the WiiU.
Changing the Static Port Setting
From the top menu, access the Firewall > NAT option, then select the Outbound tab. The first two options are:
- Automatic outbound NAT rule generation (IPsec passthrough included) – the default
- Manual Outbound NAT rule generation (AON – Advanced Outbound NAT)
You will need to change this mode to “Manual Outbound NAT rule generation”, if not already present, and save. Once saved, some rules should be automatically generated for LAN to WAN traffic as well as ‘localhost to WAN’.
Leave these rules alone and add a new rule by using the ( + ) button at the top of the list. Set the following properties:
Do not NAT: unchecked
Interface: WAN
Protocol: any
Source:
- Type: Network
- Address: The address of the WiiU (eg: 192.168.1.50), with a “/32” in the dropdown box
- Source port: (leave blank)
Destination:
- Type: any
- Address: (leave blank, should be disabled)
- Destination port: (leave blank)
Translation:
- Address: interface address
- Port: (leave blank)
- Static port: check this box
No XMLRPC Sync: Unchecked, only useful in a multiple pfSense environment
Description: I provided “WiiU AON, static port”

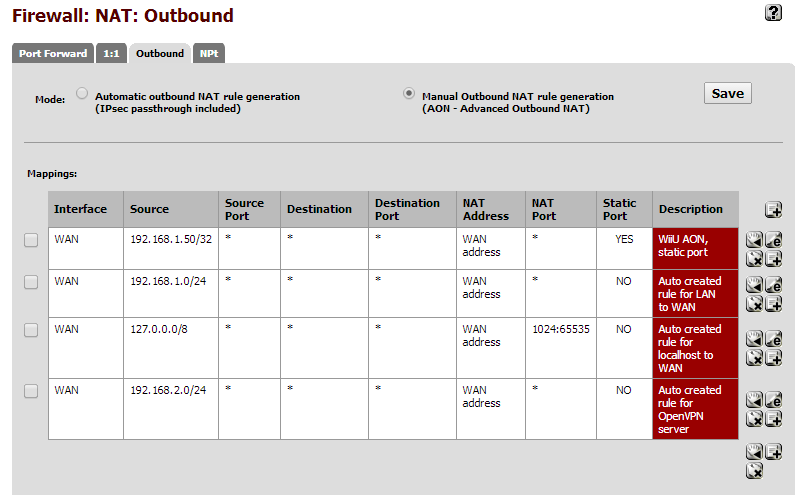
When complete, ensure the rule is at the top of the list, then click Apply Changes. Your screen should look like the following image (although not necessarily including the OpenVPN rule):
After this, exit and re-enter Mario Kart 8 or your other Nintendo Network software. You should be able to join games and participate in online multiplayer sessions.
Wait, it’s still not working!
Still having troubles getting into games, or having other people join yours? You may need to perform some port forwarding operations. While there are suggestions to forward a number of TCP and UDP ports, I’ve run a packet capture during several multiplayer sessions with the following notes:
- No TCP traffic was initiated or received by the WiiU across >30 minutes of successful Mario Kart 8 game sessions. This means that any port forwarding techniques involving TCP are placebos at best.
- The WiiU does not attempt to establish a UPnP or NAT-PMP session on the router.
- UDP ports are selected somewhat randomly from the list of non-privileged ports (>1024). In the sample session, the lowest port I saw was 9103 and the highest port was 61320.
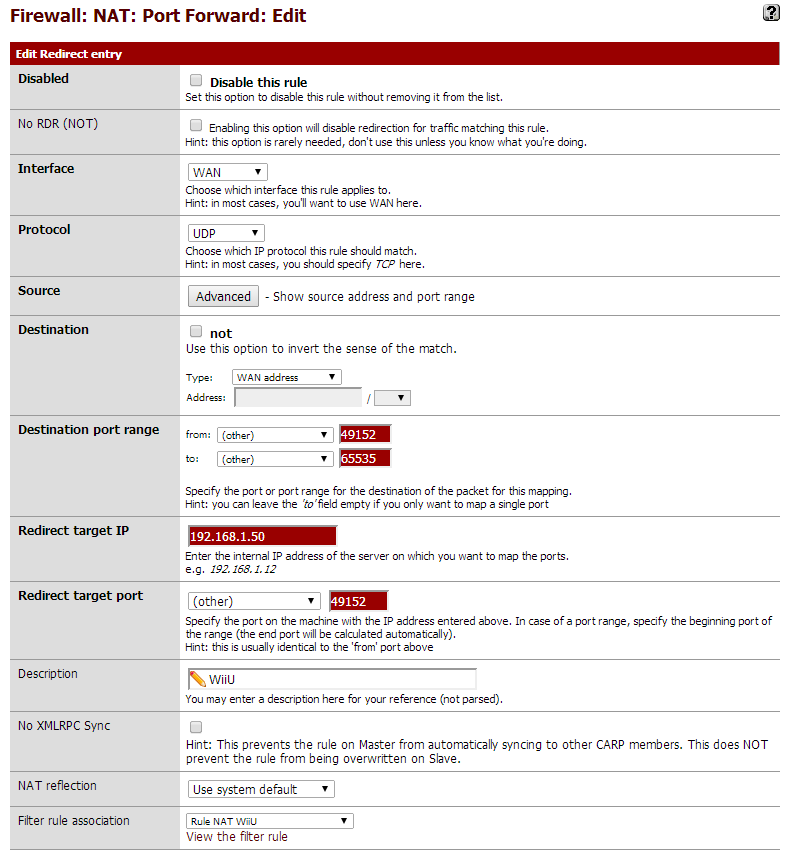
Given these details, you could forward UDP ports 1025-65535 to the WiiU IP address in Firewall > NAT > Port Forward, but I would suggest limiting this range even further to UDP 49152-65535 (the dynamic ports as specified by IANA). An example screenshot with this configuration is provided for your convenience.
What’s next?
I intend to continue to run packet captures during Mario Kart 8 sessions with this configuration to collect more data, as well as review the pfSense firewall logs during any disconnections to see if any traffic is being explicitly blocked. I didn’t capture entire content, but to replicate the packet capture:
- Enable SSH on the pfSense box
- SSH in as root, and select option 8 (Shell) from the menu
- tcpdump -i em1 -w /tmp/wiiu.pcap ‘src 192.168.1.50 or dst 192.168.1.50’ – where em1 is your LAN interface, and 192.168.1.50 is the IP address of the WiiU
- Start game session, Ctrl+C once complete and SCP the .pcap to a different machine for analysis with Wireshark or other tools
Excellent. Thanks for posting this. It was exactly the source of my problems with MK8. It’s odd to me that pfSense doesn’t let us disable the port randomization at a global level. It felt dirty to go manual on my Outbound NAT rules, and I don’t really care that much about internal hosts getting fingerprinted by their outbound port selections.
Chris – thanks for the comment, I’m glad someone else found this somewhat useful. I suppose what you could do in a clean configuration scenario is start with automatic NAT rules, then switch to manual and apply the static port option to your entire LAN subnet. Still doesn’t help if a future pfSense update changes the way AON works and you’d rather have the automatic behaviour, but I guess that’s a bit of the price you pay for running a more advanced firewall.
For everyone, I haven’t yet had the chance to go back and perform additional pcaps during sessions, but have corrected one of my misconceptions – by using “1:1 NAT” from your WAN to a specific LAN address in the firewall configuration, you can effectively have a ‘traditional DMZ’ in pfSense. I still wouldn’t recommend it though; I’d suspect that anyone experienced enough to run their own pfSense installation would also have misgivings about DMZing rather than using a more specific network config.