On cats and wisdom teeth

And now for a bit of personal focus, since I’m up on Saturday morning with a pain in my jaw. More on that later.

Recently Kayla and I became the indentured servants to a pair of cats, which we’ve named Scotch and Soda. I’ve had mixed feelings about cats over the years; I remember wanting one for many years as a kid, but I think it was more the idea of having a “real” pet than anything. Mice can’t effectively curl up on the couch beside you, and don’t really have their own personalities.
 
I will subject you to only two photos:

scotch_dslr.jpg

soda_dslr.jpg

I also had four wisdom teeth removed on Thursday and am definitely still recovering. Last night was probably the most painful part so far: an ice pack and two kinds of painkillers didn’t help much. The actual pain isn’t where the teeth were removed, but completely in the top of the jawbone. This morning is a lot better but it’s a good reminder that I need to take it easy for the next few days.

Paris: Yes, There Is Wine and Cheese

I’m currently writing from a hotel room in Paris, France – specifically at Citea Porte de Charenton – where I’m staying for a week with Kayla. The hotel and trip were selected based on a great deal from Travelzoo, but purchased through Expedia.ca when the original Air Transat Vacations site “ran out of stock” and refused to sell us two tickets at the advertised $792/person price.

On Mondays in Paris, nearly all the national museums, monuments and attractions are closed, so we’ve opted to take a day and stick around the hotel – eating cheese, baguette and having some wine. Tomorrow’s trip will be to the Catacombs, which completes the set of standard tourist activities I had wanted to finish.

Myths and Misconceptions

I’d heard some different misconceptions and stereotypes before going to France, and would like to debunk some of them now:

Beer and wine are cheaper than Coke.

This isn’t really true. In all the restaurants and tourist areas we visited, Coke was generally 1.50 to 2.60 while a 33cl (330ml) can of Heineken was closer to 3 Euro. Wine, at grocery and convenience stores, is more competitively priced.

Parisian service personnel are snooty, especially if you can’t order in French.

Everyone we encountered in restaurants and tourist areas were more than accommodating, even when it was clear we had no idea what they were saying. Simple phrases such as “merci” and “bonjour/bonsoir” went a long way towards showing that we were at least making an attempt with the language. Many know a significant amount of English and will help with ordering.

Awesome Things to Do and Helpful Tips

Here are some of the things that stood out to me as great experiences. If you’re considering a trip to Paris, I’d highly suggest you check out the following.

For dinner one evening, we went to La Petite Hostellerie, which offers traditional French cuisine and a fixed-price (10 or 16 Euro) menu including appetizer, entree and dessert. Kayla and I both enjoyed the onion soup and “boeuf bourguignon“, a stew with beef braised in red wine. The service was friendly and excellent, and the food was quite stellar. Definite recommendation.

I’d also suggest a Paris Visite pass with zones 1-3 for the length of your stay. You’ll likely have to inquire at your hotel which metro station you should buy the pass at the first time; not all of them have attendants. With the Paris Visite pass you’ll also get a map with all the metro and RER (express train) stops – it’s pretty easy to plan just using it. Some metro trains also require you to push a button or raise a lever to open the doors when entering or exiting; they don’t all open automatically.

The Eiffel Tower can have ridiculous lines for the elevator to the second level. If you’re up to it, locate the ticket counter for the stairs entrance and walk up – you can still buy a pass for the elevator to the top once you’re up there.

Ask at your hotel where the nearest supermarket is. It’s much cheaper to make sandwiches with a baguette, cheese and sliced meat than eat out all the time. This way, you won’t end up like our first day: wandering around, looking for a cafe or restaurant with reasonable prices at 2:40PM, and realizing only later the following: 1) that many places are closed or close their kitchen after 2:30PM until they start serving dinner at 5PM; and 2) the phrase “7J/7 service non-stop” means that yes, the restaurant is open seven days a week, but is not open 24/7; they just don’t close between lunch and dinner. Check their hours and note that if they close at 10PM, they might be out of most food by 9.

This was the source of much grief on our first day, where we were exceedingly tired and hungry and managed to miss both lunch and dinner times. We were lucky and located 2-minute microwavable meals in the hotel vending machine, which held us over until we got to the supermarket the next day.

When picking attractions to visit, check for the following:

  • Location: Can you combine several spots one after another? While the metro comes incredibly frequently, the 14 lines are incredibly extensive and it may take longer to get between destinations than you might think.
  • Price: Pick spots that offer student/reduced rate tickets, or free admission on certain days and times. You don’t necessarily need an ISIC or similar – just a student card from your university or college generally works.
  • Hours: Some attractions will be open until a certain time, but restrict entry up to an hour before that. Plan accordingly, especially if you’re already running late.

I may post some photos, but they’re probably not anything you can’t find on Flickr already. Hope this helps!

wpfix.py: allow your Linode WordPress sites to auto-update

We’re moving our client sites and other activities away from Dreamhost to Linode, and one of the features that’s really nice is how the WordPress auto-update mechanism works. While it’s a neat trick to be able to upgrade an application from within itself, the design of PHP/Apache/WordPress requires either FTP access (boo!) or for WordPress’ files to be owned by the web server user (not always practical, especially in a low-memory VPS environment.)

Once again, Something Awful comes to the rescue with instructions on setting appropriate user permissions and making a wp-config.php change. It’s summarized in Geoff’s weblog – essentially certain wp-content directories become owned by www-data, and a new constant (FS_METHOD = ‘direct’) gets defined in wp-config.php.

I’ve written a terrible Python utility to automate this, called wpfix.py. It’s run from the command line as root, and takes a path to a WordPress installation. It will perform all the permission changes and edit the wp-config.php file for you. If it can’t, it will at least fix the permissions and let you know the change to make.

Update 2012-01-10: The latest version of wpfix.py is now in my scripts repository on GitHub.

A comparison of several cold medications

This weekend, I ended up picking up a nasty cold – whether it was from Oktoberfest, or just a residual thing floating around. In any event I’m being blamed for spreading it to my roommates, and I feel like utter crap. There’s nothing like needing to blow your nose every five minutes to really kill productivity. I have the option of working from home, at least, so that I don’t enrage and infect other people at the office. I do have several non-prescription cold medications to try out, though, so why not document them?

Sudafed Cold & Cough

Sudafed is one of the original medications containing pseudoephedrine, which is the active decongestant ingredient. The Wikipedia article discusses some potential various meth-making uses, but frankly when I have a cold I want the most potent drug possible so that I can either get some rest, or get on with my day. In short, the Sudafed PE variants are terrible, as they have a less-effective ingredient – they should probably be called Placebo Edition.

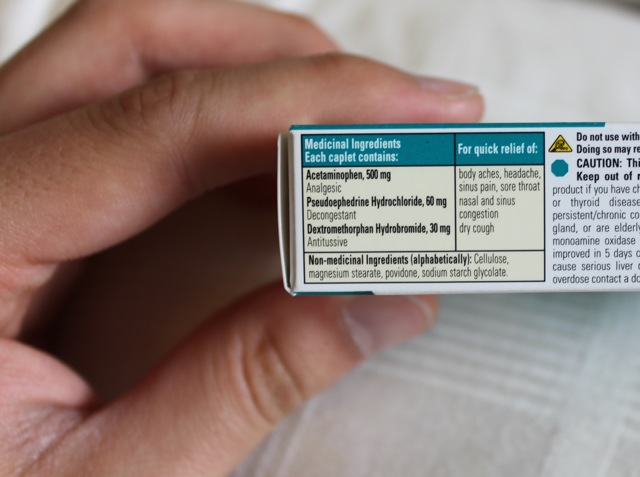
Reading the various product descriptions, the Cold & Cough and non-PE Decongestant give you the most active chemicals for your purchase. Cold & Cough also contains 30mg of dextromethorphan, which allegedly suppresses coughing. If you’re looking for strictly pseudoephedrine, the Decongestant-style has 120mg in time-release format.

Unfortunately, Sudafed did not come through as promised yesterday afternoon. After taking one pill, I continued to be stuffed up and generally watery-eyed, with the occasional dry cough. There was an improvement in my general attitude and energy level, but not the level of expected relief.

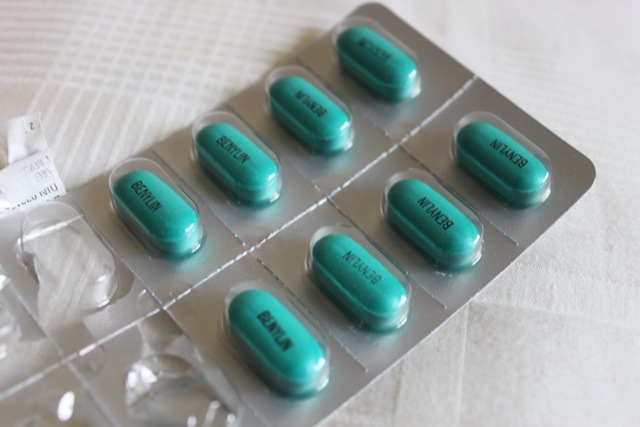
Benylin 1 All-in-One Cold and Flu Caplets

Upon a recommendation from Dave last year, Benylin caplets have become a regular product in my medicine stash. Like Sudafed, the product contains pseudoephedrine and dextromethorphan but in half the amounts. Thus, you can take two caplets every six hours safely – which gives you an extra 500mg of acetaminophen and 200mg of guaifenesin (which encourages phlegm to get out.)

I took two of these this morning, after a night of terrible sleep and general stuffiness, and within fifteen minutes I was up and working with much-reduced congestion. The effects of the guaifenesin are definitely noticeable – when I cough, it’s a cough with a purpose. These would certainly be my first choice of pills to start warding off a cold or to generally perk up during the day.


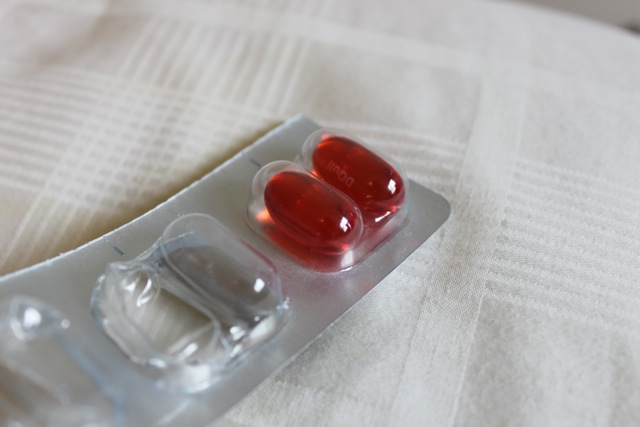
Vicks DayQuil LiquiCaps

Left over from a previous cold, I’d never actually tried these pills before. They contain dextromethorphan, but not the pseudoephedrine – instead replacing it with the non-meth-convertible and less effective phenylephrine.

Unfortunately, the medicine had little effect. After two pills yesterday morning things kept going downhill and I seemed to get even more congested. My attitude and temper was also pretty poor due to being sick. I wouldn’t really recommend them unless you respond properly to phenylephrine – clearly I don’t.


End Results

From actively examining the ingredients in these products, Sudafed and Benylin should both be nearly equally effective from a medical standpoint. For me, the extra acetaminophen and guaifenesin in Benylin is the key ingredient to turning a general unmotivated, “sick” feeling into reduced pain, less congestion and a better attitude. As I’ve been writing, I’m nearly back to feeling normal, which is really all I can ask for. Some things I will try if this cold continues:

  • Cough and cold syrup generally contains more active ingredients, and DayQuil/NyQuil are competitive here. Theoretically it should also take effect more quickly, and might have the advantage of soothing the throat at the same time.
  • Generic drugs (eg: Life brand) might be very competitive if you can match the amounts of chemicals to the name brands. Essentially I want to try for 30+mg of dextromethorphan and 60+mg of pseudoephedrine in each dose, combined with 500-1000mg of acetaminophen.
  • Taking anything with guaifenesin before bed isn’t well-advised; even if there is a cough suppressant at play, you’ll still be dealing with phlegm and enraging anyone else in the bed or the next room with nasty-sounding hacking.
  • Remembering to get to a pharmacy instead of a convenience store – they’ll generally have better prices and more of a selection (extra strength vs. regular.)

CSV and TSV files for countries, states and provinces

I’m currently working on an e-commerce project after my regular job, and needed a batch list of countries, US states and Canadian provinces to prepopulate <select> fields. While Ubercart has one of the more complete implementations on their contributions page, I’m not running Drupal for this application and didn’t feel like reverse-engineering the CIF uploads to work with my much less enraging database. I just wanted some .csv or .tsv files that I could import into PostgreSQL.

The countries file is modified from the Country List with ISO Codes file at Text Fixer, and is a tab-separated value file. phpPgAdmin reads this properly. Change the header columns from ‘code’ and ‘name’ to your preferred table columns, and go ahead.

Countries TSV

The states and provinces files are comma-separated values, and have the same ‘code’ and ‘name’ column headers. The states file was from this blog, which is down at the time of posting but Google has a reasonable cache of the particular page of interest. provinces.csv was compiled by myself.

States CSV

Provinces CSV

Restoring photos from SD with PhotoRec

My girlfriend Kayla and I both recently purchased new DSLR cameras – she owns the Nikon D5000 and I have a Canon T1i. Mine has mostly been used for macro photography and not anything too serious yet, but I quite enjoy it so far. I’m hoping it doesn’t end up like what Dave and Warren consider my most foolhardy purchase, a MIDI keyboard that I’ve allegedly never used. (They may not laugh as much when Rock Band 3 launches, since it should work with the game.)

One of the main issues I ran into was not wanting to purchase a SD card from Best Buy or another retailer, since places like Canada Computers and NCIX have the equivalents for significantly cheaper. Up until this point I’d just been using a 1GB PNY card, so I transferred it to the T1i and started taking shots. The 1GB size is good for about 200 to 250 pictures in JPEG format.

My issue and story really begins when I switched laptops and neglected to back up my iPhoto library or the original JPEG files. All of my media files are stored on a server, and the photos for one reason or another didn’t make the cut. Most of these photos weren’t a huge loss, but there were some shots of an Ottawa trip that I’d never really gotten around to categorizing.

Armed with the SD reader in my laptop, I used a command-line utility called PhotoRec to examine the contents of two SD cards. Both cards had been formatted multiple times: the first one displayed no files in Finder, and the second one had been wiped for Wii savegames.

Process

Here’s the process that I found worked best on a Mac, after downloading and extracting photorec and testdisk to a temporary directory:

1. Insert the SD card into the onboard reader. (I didn’t have any luck with an attempt reading directly from the camera, so I’d suggest using a dedicated SD card reader if at all possible.) Ignore iPhoto if it comes up.

2. From the command line, change to the temporary directory and run:

sudo ./photorec

and provide your account password.

3. Select the “Disk /dev/rdiskX”. It’s best to look by size – my “blank” 1GB SD card appeared as /dev/rdisk3 with 1030MB / 982MB sizes. Continue with selecting a Intel/PC partition table.

4. Choose “No partition [Whole disk]” when prompted, rather than the FAT32 partition. This ensures the entire SD card is searched and made a difference in the number of photos recovered from the Wii-formatted card. The filesystem will be Other (FAT).

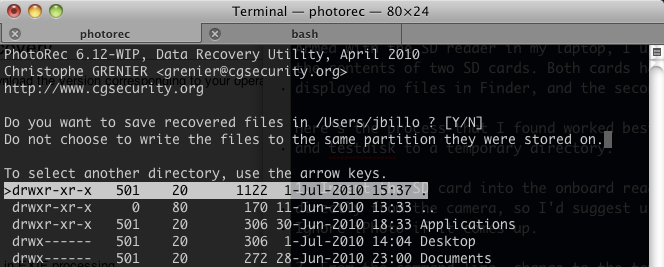
5. Select the directory to extract to. PhotoRec will create a subdirectory whereever you select called recup_dir.N where N is a number.

Terminal with directory

6. Examine your photos once the process is complete. Certain photos may only have thumbnails (tNNNNNNN.jpg) available. You can remove these at the command line by changing to the recup_dir.N directory and running:

sudo rm -rf t*.jpg

7. Feel free to change ownership of the files if you would like to modify them. This can be done through Finder by selecting all of the photos (Cmd+A), choosing File > Get Info, unlocking the Sharing and Permissions panel and allowing your username or everyone read and write permissions. (The command line equivalent would be sudo chmod o+w *.jpg in the recup_dir.N directory.)

Results

Of about 300 photos on each card, 244 were recovered successfully from the first card and 65 from the second card used for Wii savedata. PhotoRec worked as intended and now I have some additional files for my Flickr account! I leave you with a sample view from Parliament in Ottawa.

RSS feed fixed, spams Google Reader in process

I fixed the RSS feed for this content management system (now /feed permanently redirects to /rss), but unfortunately it decided to replace the GUID values from the original WordPress installation. Sorry if I spammed your RSS client – my Google Reader account displayed several copies of these items.

Experiences moving to a Debian 1U server

The two Linux machines I use at home for testing purposes have outgrown their useful life – they take more power than they’re worth to run, replacement components are only available as refurbished items, and the amount of space occupied in my room is disproportionate to their use. What follows is an initial attempt to configure a basic Debian file server.

The Rack
I decided to go with a standardized server rack so that I could locate my (future) switches, servers and other components in one place – namely a closet. I’ve ordered a 13U table top/wall relay rack from Primespec, a local supplier of cables and other electronic equipment. Once I take delivery of the rack, I’ll follow up with my impressions.

Server Equipment
Originally, I was going to migrate an existing Pentium D computer into a standardized 1U server case. After research, moving current equipment into anything smaller than a 2U case is an exercise in cost increases – since you have to locate processor heatsinks, rackmount-compatible power supplies, and motherboard backplates that work in the environment.

Since my usual supplier NXSource didn’t have anything in stock that fit my needs, I went to Newegg.ca and purchased an Asus RS100-X5/PI2 barebone server. The server comes with a reasonably spacious 1U case with capacity for two 3.5″ hard drives and one slimline DVD drive, P5GC-MR motherboard, 1U heatsink for 65W processors, and a 180W 1U power supply. It does not include sliding rails or the half-height DVD drive – both features I didn’t immediately need.

In my case, I already had a 1TB Western Digital SATA hard drive, so I just needed some RAM and a processor. I bundled a Core 2 Duo E7500 (2.93GHz with VT for better virtualization performance) for another $31, which is cheaper than even the chintziest Socket 775 Celeron.

The board also supports dual-core Xeon 3000-series chips, but the Core 2 was too reasonable to pass up. Some of the specifications for this motherboard indicate that it only supports 2GB RAM, but I’m running 4GB DDR2 (2x2GB sticks) without a problem. The board also does not have an Intel RAID controller, so you’ll need to use a software RAID solution for this capability.

Software
My operating system options for this server were:

  • Windows Server 2008: Decided against another Windows machine as this particular system will be headless and not directly connected to a monitor. I also don’t have any more Server 2008 R2 licenses, and would have to use the older 2008 version of the OS.
  • Windows Home Server: Since the server chassis only has two drive bays, much of the drive pooling and data mirroring features would be lost for this particular machine. I also lacked an available license for this OS, and the next version of Home Server should be out sometime this year.
  • Linux: Debian stable was the right choice for this server’s particular purposes. It’s well-tested, robust and should handle my webserver, database and file serving requirements. It can also act as an AFP server for my MacBook Pro, which subjectively seems to perform much better than SMB sharing for networked iTunes libraries. With Linux, I can also set up the system as a router, proxy server, Squid cache, or SVN server with ease. Finally, the awesome VirtualBox package has a terminal-only interface, so I can run an XP virtual machine for our accounting system.

Installation
Since I opted not to purchase a slim DVD drive, I used UNetbootin to transfer the Debian stable 64-bit netinstaller to a USB stick. (This version even works on a 128MB stick.) The server automatically boots to USB or an installed DVD drive.

Debian installed quickly and I accepted most of the defaults, choosing LVM for the partitioning setup in the event I want to add another drive to the server. One of the main issues I encountered was hard drive position assignment – a combination of the BIOS, USB stick and UNetbootin preparation assigned the USB stick device identifier /dev/sda and the hard drive as /dev/sdb. This causes issues with the default GRUB installation and fstab file.

Fixing Installation Problems
To avoid the above pitfalls, follow these instructions:

  • Select “No” when the Debian installer asks to install GRUB to the master boot record. Instead, specify /dev/sdb.
  • Use the “Go Back” option in the Debian installer just before it wants to reboot, and start a shell. In /target/boot/grub, use nano to edit menu.lst. Under the “## End Default Options” section, change both instances of root (hd1,0) to root (hd0,0).
  • While still in the shell, use nano to edit /target/etc/fstab. Change the line for the /boot partition from /dev/sdb1 to /dev/sda1.
  • Exit the shell and choose the “Finish installation” option to reboot the server.

Next Steps
I’ll be following the guides on the Linode Library and Slicehost Articles sites to further configure the server. Other than that, suggestions for awesome console applications like irssi are always welcome!